Volcanic has been developed further since this page was first written and new features have been added. The bulk of this information remains the same, but the images (and couple of the comments) in this guide are out of date and wont perfectly match what you are seeing. My screenshots are missing a few intriguing tabs that you'll have, for example..
This is a very basic, very detailed set of instructions on creating custom content for FreeSO, using a small, decorative object as its focus. With slight adjustments to the roomscore, weight and height flags, this object can serve as a starting point for any single tiled object you would like to make. This page also serves as an introduction to Volcanic, the object creation program that was included in your FreeSO download.
No experience with programming or with Volcanic is required to follow along, and it is assumed that you have never created any object for The Sims before. If you are an experienced Sims object maker, you will likely find this tutorial object too basic to learn anything new from, but you will still find the guide useful for making the transition from the old TS1 programs to FreeSO's Volcanic, allowing you to dive right in to your more complex project ideas.
Once you are somewhat familiar with this process, creating a basic object like this one will take you a few short minutes, even when working at a pretty casual pace. Here is an overview of what we are about to do .
The TL;DR list of the basic steps
-
- Assemble your Art Assets
Step One - Before you begin -
- Create a new object file, using Volcanic.
Step Two - Create your iff -
- In Trees and Resources create and edit a 'Main'and an 'Init' Tree
Step Three - Edit your iff - In Entry Points assign the 'Main' Tree to Main function and the 'INIT' Tree to INIT function
- In Trees and Resources Create a CTSS with object's name and description (as seen in the catalog)
- In Trees and Resources use Select as My Catalog Strings to assign CTSS
- In Trees and Resources import your sprites
- In Appearance create a drawgroup and add sprites to all 4 rotations
- In Appearance use Set as First to set your drawgroup as first graphic
- In Appearance use Set as Last to set same drawgroup as last graphic
- In 3D Debug Import your model for that drawgroup.
- In Objects use Regenerate to generate a thumbnail
- Save in the Resources tab.
- Know the information required for your object's catalog_downloads.xml entry
Step One - Before you begin
Assemble your art assets and descriptive text
 Before you begin with this guide, you'll need to have done a couple of things to prepare. First, you'll need to have figured out what you want to make. Second, you will need to have all of your art completed and ready to pop into the object when the time comes. Third, you should also figure out what text (the name and description of your object) you'll want displayed in the buymode catalog.
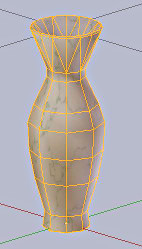
Obviously, this little object of ours will be a lot more satisfying if you come up with your own project idea, using your own project art, and I STRONGLY encourage you to do so, but if you haven't or can't do these things yet, don't worry! I've got you covered; you can download and use my little vase if you need to.
If, on the other hand, you are able to make your own art (or have partnered up with an artist) then YAY! Off you go! Go make a piece of decor that is small enough to put on an endtable. I'll wait here. Once you have gathered your art assets and your catalog text together, put them somewhere you can find them easily when we are ready to use them.
If you are interested in creating your own art assets, but not sure where to start, check out these quick videos from Chaul on modeling and texturing a vase in Blender
Once you have your model and texture, you can use the FreeSO Sprite Exporter plug-in to create the 2D Art assets.
(You will also need to export your model as an obj to import it into FreeSO, but I'm afraid I don't currently have a tutorial to link to for that just now.)
Start Volcanic in Sandbox Mode
The same launcher used to start FreeSO can be used to start Volcanic by right-clicking the PLAY button. (Those who do not use the launcher can find Volcanic located in the same folder as FreeSO.) When you start Volcanic, FreeSO will start up. Yes, this is normal; This is good; You didn't make a mistake. The two work together, allowing you to test your work as you create or edit the objects (SQUEE!!).
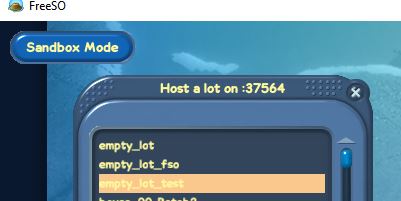
Obviously, you do not want to to log into the live game to work on custom content. Instead, click the Sandbox Mode button in the upper left corner and double click one of the listed lots listed such as "empty_lot_fso". If you have not used Sandbox mode before, you'll probably want to click the CAS button first and create yourself a sim. (DO NOT click the "Join a Server" button. That has nothing to do with what we are doing.)
Step Two - Create your iff
Once you've entered the sandbox lot, Volcanic's main window will open starting you off on the Resources tab, which we'll come back to later on. Switch to the OBJECT BROWSER tab and then click the Create New Object button and choose a name for your new file.


Next you'll be asked to choose an internal name for your object and to enter a GUID. The name can be entirely different from the file name if you wish, but I like consistency so let's go with the very similar "My First Decor".
Each object must be given its own unique GUID (Global Unique IDentifier). Not only do these GUID numbers need to be different from each other in a multi-tiled object, they must be unique throughout the entire game (or "globally".) If anything else in the game is already using this GUID, a conflict is created. The Random GUID button will help make sure your object gets an unused number, so go ahead and click that, and then OK.
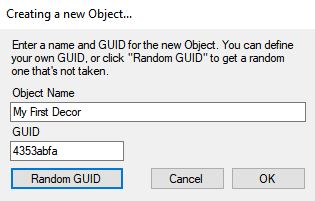
REMINDER: The GUID generated for you will NOT match the one shown in these pictures that was generated for me.
Step Three - Edit your iff
Volcanic has now created a mostly empty iff and has very kindly opened that new file in its Editor for you.
The newly created iff file has 2 resources in it, an OBJD (which is, in part, displayed on the Object tab that you've opened onto), and a STR#128 Strings resource that is a list any animations your sim will use when interacting with the object. We wont be using any animations for this project, so we'll just ignore the string resource altogether and turn our attention back to the Object tab.
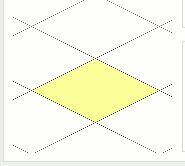
The first thing you've probably noticed is that Volcanic does not automatically create any graphics resources, so all you see in the preview window is the little yellow floor-tile marking where your object is. That is fine. We'll get to graphics later.
You might have also noticed the large "<NO CTSS>" in the middle of your editor window. The CTSS is the Strings resource containing your (build/buymode) catalog text strings. We'll be adding the CTSS later, so, for now, ignore this message.

Additional catalog information is added right here on the Object tab.
The "Lot Categories" check boxes are only used to add lot type restrictions (so the object may be used on specific lot types, biut not tohers) Since we want our decor to be available for all lots we will leave all Lot Categories UNCHECKED.
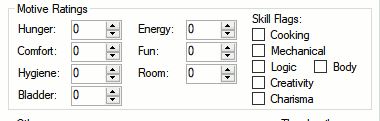
The "Motives Rating" section does not work in Volcanic yet, but when it does this is where you'll enter the number(s) that you wish to be displayed in the buymode catalog information. It is important to understand that entering a number here does not actually GIVE our object the ability to increase any motives or skill, though. This field is simply a note informing the player what they can expect from this object. For this project, for example, we would enter a "4" for the room score and you will actually give your object the functioning roomscore in a few minutes, when we work on the "tree" resources.
You can ignore the greyed out "buy mode category" and "build mde category" drops downs and the "Sale Price" altogether because FreeSO uses a different method of organizing the catalog and setting the prices. You can also ignore the generate thumbnail button for now since it cannot generate a thumbnail until after the art has been included so we'll come back to that later; We are done on this tab for now.
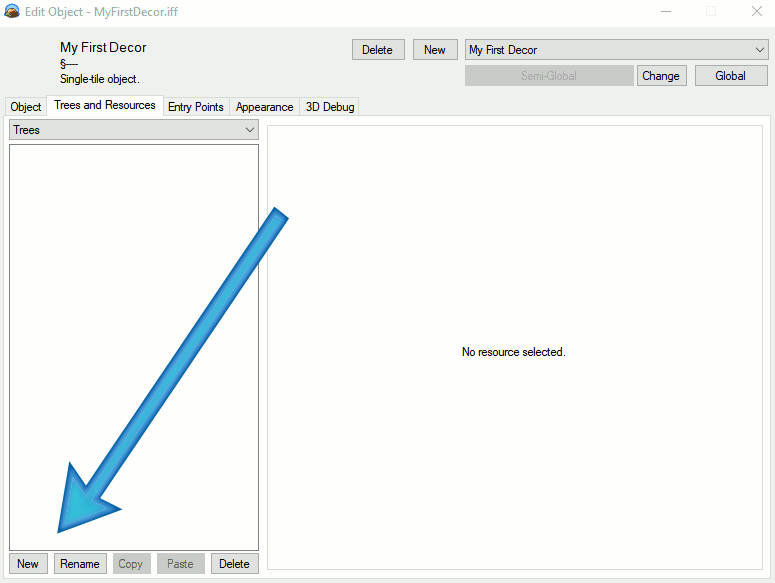
Switch to the TREES AND RESOURCES tab. This is where most of the work gets done in Volcanic.
You start off on the Trees item of the drop down list. Anyone who worked in the old TS1 programs will know these as BHAVs instead of Trees.
Trees and Resources - Trees
Every object needs a minimum of 2 trees, the "main" and the "init" tree.
The INIT tree tells the object how to begin existing in the lot. It sets up a bunch of rules-n-stuff including the starting values for attributes, permissions, and placement rules, and so on before the object is even placed on the lot. Many of these values get changed by other trees later. Some simple examples of the the things you'd declare in an Init tree are "yes, this object can go on slopes", "no, not on pools", "this object can sit on tables", "this object cannot have a wall on its left side", "this object is a light source" and so on.
The MAIN tree tells the object how to continue existing after it has been initialized. In the case of our nice, simple tutorial object we want it to just sit there and look pretty. Nothing more. But if we were making a lit candle we'd want it to constantly flicker through a few different graphics so the flame would be animated. Or if it were a balloon we might want it to just sit there for 12 hours and then pop or float away. If it were a plant might we'd want a water counter to tick down or a bloom counter to tick up over time. All of these things would be done in the main tree.
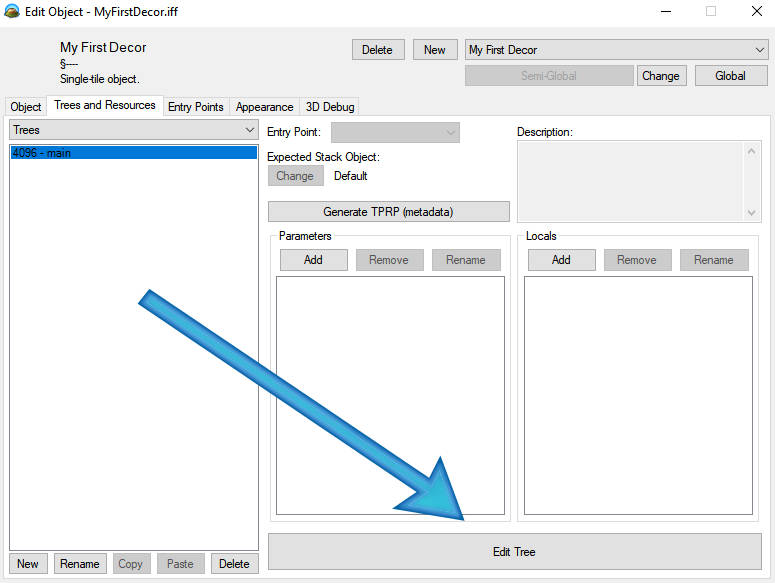
These two trees, the main and the init, can exist inside of the iff file itself or in a global file that your object has access to. We are going to build them right here inside of the iff itself. Click the NEW button to add your first one.
We'll start with the "main". When naming your resources you get more points for clarity than wit, so always keep your labels simple, accurate, and clear. So use the unimaginative, very on-the-nose "main" for your chunk label. You can leave this chunk ID at the starting value of 4096. With your new main tree selected, click the Edit Tree button (or double click the "main" tree in the list) and open the trees editor.
As mentioned above, our tutorial object has no function other than to exist and look pretty. All that is required to 'exist' in the game is a single node in the main tree: an idle node. Needing to "idle" for a span of time is extremely common, so a few variations were pre-made and placed in the global file (global.iff) that every single object has access to. We are going to use one of those.
To find it type "idle" in the search field and select [Global: Idle] from the results. Click anywhere in your workspace to place it.
It is designed to idle for however long you tell it to and you do that by clicking your placed node and entering a number in the Argument 1 field. The number you are entering is how many ticks you want your object to sleep (idle) for. More ticks means a longer time. There isn't a number for "forever' which is what we want so, instead, we'll enter a huge number like 20000.
Fabulous!! Next we must tell it what to do once 20000 ticks have passed. That's what the little red X bubble and the little green Check bubble are for .. the next instructions. The red bubble is for False returns. The green bubble is for True returns. All we need to worry about in this case, is the True return. Once 20000 ticks have passed successfully what should the main do? Sleep for another 20000 ticks! So grab that little green bubble and drag it upward back to it's own node. A little green arrow head will appear overlapping the green bubble pointing back at it's own node making the main loop back on itself forever which, in a Main, is a good thing.
The idle node wont ever return a False, but lets not ignore it. Using the menu bar, Insert a "False" (or Ctrl + F), and drag the False bubble's arrow to it.
That completes the Main tree so close the trees editor and lets move on to our second required tree, the init.
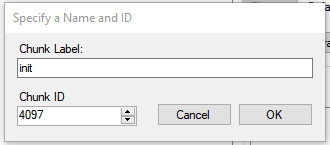
As before, click the New button to create a tree. Increase the Chunk ID by one (to 4097) and name this tree "init" and then open it up in the Trees editor.
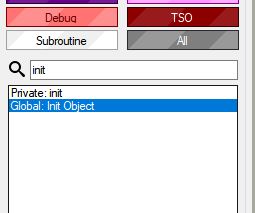
The Global has another pre-made tree in it that we can use to kick our new init tree off. Search for "init". Only 2 entries are found this time and one of those, the one labeled "Private:", is the tree that you've just made. A private subroutine is one that exists inside of the self-same object. The one labeled "Global:" is the subroutine that exists inside of global.iff and it contains all of the basics a sim object needs. Choose that one and place it in your workspace.
Now that you have laid a basic foundation, you will add to it and refine it to your project's specific needs. Our little decor, for example, should go on surfaces, which is not set up in the very-useful-yet-generic [Global: Init Object] tree. We'll also want to add some roomscore to our decorative object. To add these refinements we will add our own nodes after the [Global: Init Object] call we've just placed. "After" is very important as it allows us to countermand any rule have been set by the global tree, that don't fit the way we want our object to work.
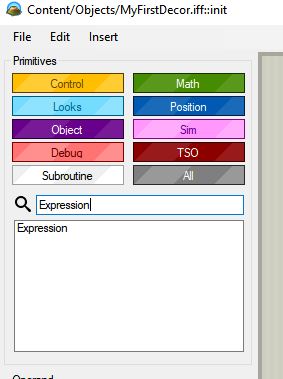
There are a variety of primitives available, but for our purposes we need the oft-used Expression primitive. You can find it by searching for "expression" (if it does not show up, you may need to click the All filter button), or you can use one of the colorful Filter buttons to shorten the list to more manageable length. Expression can be found under both the green Math or the yellow Control filter buttons. No matter how where you found it, the Expression node will always starts out as yellow and then, depending on the operator you choose for it, may turn green.
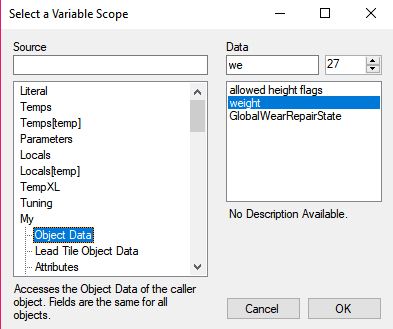
Add one to your workspace, remember to click on it after it has been placed to select it, and Edit the LHS (Left Hand Side). We'll start with making our decor go on surfaces and that means setting its "allowed height flags". This is found under Object Data
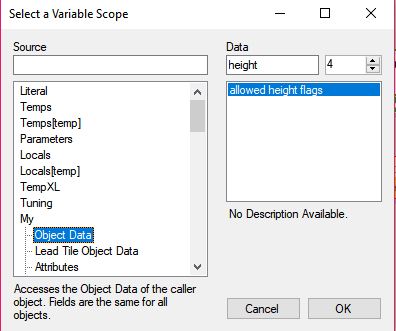
TIP: Both the Source and the Data fields act as searches when you type in them (Double SQUEE!!), so you can, for example, type "height" into the data field to find the "allowed height flags" very quickly.
With the LHS set up, we move to the operator. In this case, you want to choose the "Set Flag:" operator from the Operator dropdown menu. This operator tells the game to do something rather than asking it to check on a condition. Since returning false would be impossible in such a case, the True/False bubbles have been replaced with a single, blue "Done" bubble.
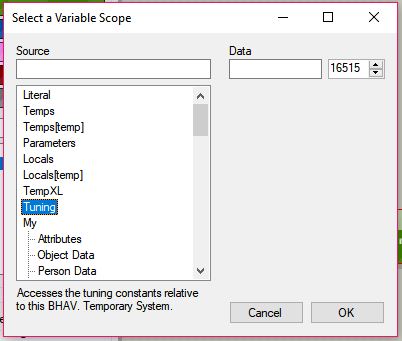
And, finally, edit the RHS (Right Hand Side), this time choosing "Tuning" and typing in the number "16515". When your node updates it'll display the label for a Global Constant used for heights and even include the literal value in parenthesis for you. An alternative way of doing this would have been to pick "Literal" instead of "Tuning" and type in the value directly. Both ways give the exact same results, but using constants means everything stays in sync if someone were to come along and makes a change in the future.
There is no way to tell this from the information displayed on the node (yet?), but setting this flag (Constant std height #3 (4)) will allow our decor to sit on counters.
Add 3 more nodes just like this one changing, the RHS so our decor can sit on end tables (Tuning 16520), tables and desks (Tuning 16514), and coffee tables (Tuning 16513). Yes, we skipped heights "(7)", "(6)", and "(5)". Those are used by the game for other things and we don't need them.
Our generic global call to [Global:Init] tells it that is IS allowed on a floor, since so many objects are. Normally, I love when things go on surfaces AND the floor, but for the sake of learning we're going to overwrite that sucker and expressly forbid it by placing a conflicting rule AFTER that global call we started this tree with. Remember, the game will always respect the last rule it received on the matter so make sure your new, specific rules always come after the generic set up.
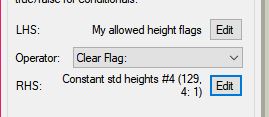
Make one more node, set the LHS up the same way, but this time choose "Clear Flag:" as the operator and RHS should be Tuning 16516 (cause Maxis put this one out of order). This node actively prevents the object from being placed at floor height.
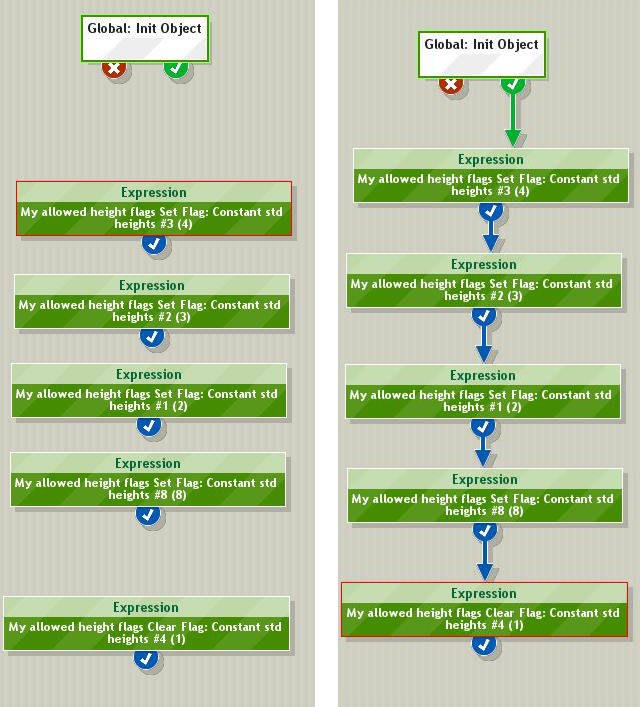
We've placed 5 new nodes into our tree but simply being in there, free floating like that, isn't enough. The game needs a clear set of instructions on which nodes to use, in which order, and under what circumstances. We give it these instructions by linking the nodes toogether with True/False/Done returns. Everything else in our workspace is completely ignored.
If you look closely you'll notice that the very first node we added to this tree has a green border, instead of the normal white one or the red that shows us which node is currently selected. The green border tells us that this is The First Node. The game always starts at The First Node of each tree and follows our GOTO instructions (True/False/Done) from there. So let's go ahead and give it some instruction. Start with the First node and drag your (green) True bubble down connect to to your first height node. Then drag the (blue) Done bubbles from each of those nodes to the next, chaining them together.
If you ever make a mistake and realize that you actually need another node to be the start of a tree, you change fix that by highlighting it and clicking CTRL+1 or by choosing "Set As First" from the Edit in the menu bar.
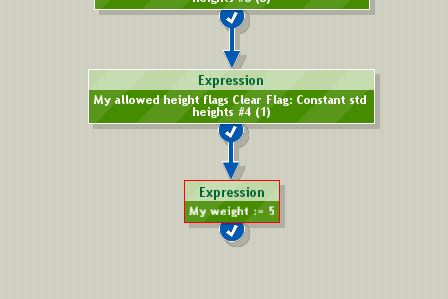
There's our height rules done. Some of the surfaces we chose (like end table) reject larger objects even when the allowed height flag has been set. This is an interesting combination of the table's container slot settings, support strength, and our objects weight and size. Our global init tree set a size but didn't really set a weight, so lets add another node and give our decor a little weight.
Find "weight" for the LHS
This time for RHS we'll use a literal number. "5" is a good weight for tiny objects. ("5 whats?", I hear you asking. I have no blessed clue. But 5 is used in other small objects, so we are following Maxis' lead.)
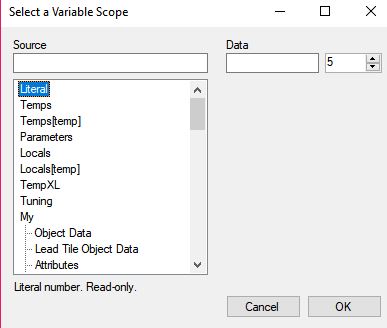
And for operator choose := which is the symbol for "assign to" There we have it. "My weight assign to 5"
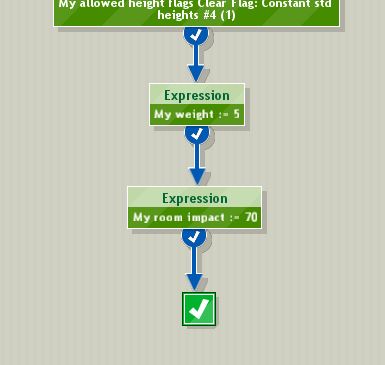
Our final task in this tree is to set up its room score contribution. Remember that "4" we would've added to the Object tab's "room" field a while back? The one that would have been just a bit of text in the buymode catalog? This is where we take that bit of text from an empty Buymode Catalog Promise and turn it into a legit Roomscore Reality. I'm not sure what the formula is for converting "roomscore contribution" into the 10 point grading system that the buymode catalog uses room scores, so I took a look inside of existing decorative objects (sculptures) that have the same room score listed that I want and copy the room score contribution it uses. It turns out that to rate as a "room score 4" object we need to make our room score contribution "70".
Add a final node to our init and, using a literal value on the RHS, make it look like this (pop quiz, baby!) and have it terminate as true.
Now that we've created both of the trees that our object requires, we must assign them to the functions that they were created for. As you learned earlier, just because something has been created and is sitting around inside of our IFF file, doesn't mean the game will automatically use it. We must specifically instruct it to use these two trees, and that we do on the ENTRY POINTS tab.
Entry Points (The Functions Table)
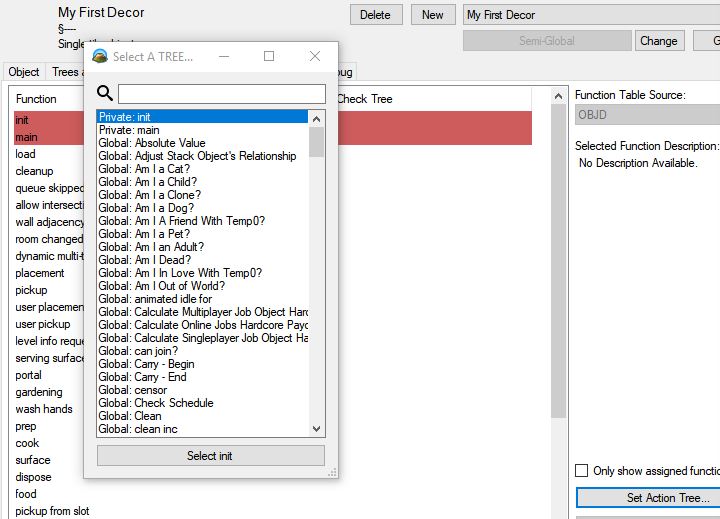
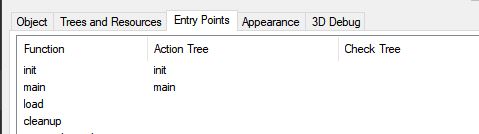
Switch to the Entry Points tab and the first two functions you will see listed are init and main. They are highlighted in a mildly alarming red because nothing has actually been listed for these two crucial functions.
Select the init function's line, click the Set Action Tree, and choose the init you have just created (Private: init) and Select init as the Action tree for this function. (NOTE: the select button text changes slightly with the selected tree's name displayed. If you named your init tree something else, that will be displayed on the button instead. And in that case I'll trust you can make that conversion with everything else from here on out, smarty pants!)
Repeat to select your "Private: main" tree as the Action Tree for the main function.
Trees and Resources - Catalog Strings
Now let's finish setting up that buymode catalog. For this we need a "catalog string" which you'll find it further down the list in the drop down menu, below the "Trees" option.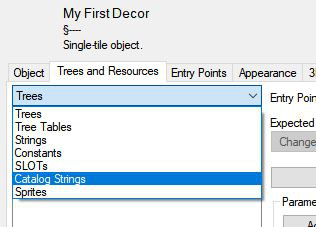
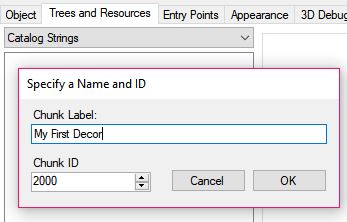
Click New to create your catalog string. Traditionally, these use chunk IDs in the 2000 range, starting with 2000 itself so let's use that. The name can be anything and is usually as the object's internal name. (I confess I'm pretty lazy so I usually just name them "catalog". Don't judge me!)
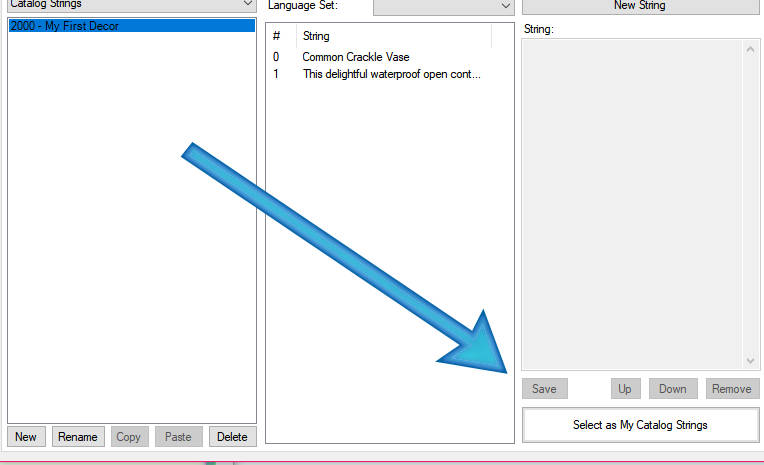
Highlight your new Catalog String resource to open the Strings editor. A catalog string only needs 2 lines. The first is for the object's name and the second is for the buymode catalog description.
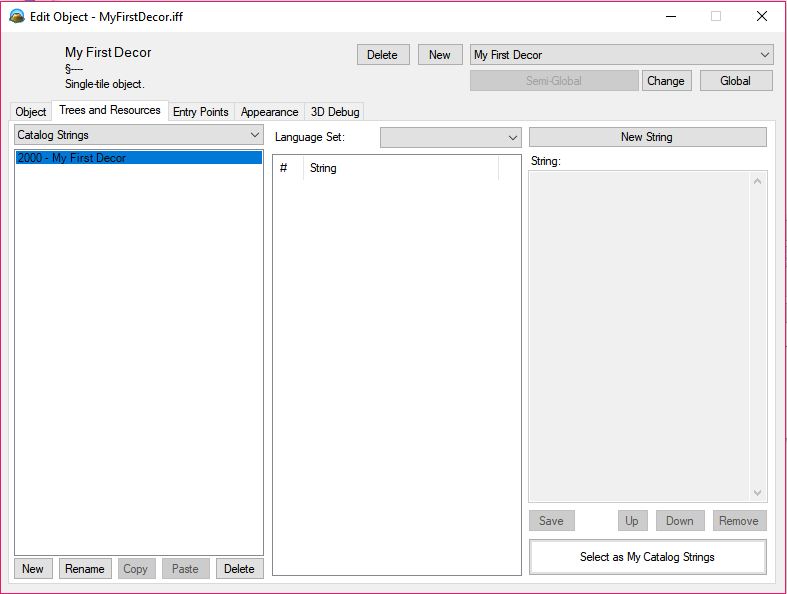
Hit the New String button to create the first one and highlight it. Now you can enter your object's name as it should read in the buymode catalog into the "String" frame to the right. While Volcanic automatically saves your changes in its other editors, it does not do so in the Strings editor. Once you've finished typing your text in, click the Save button to actually save it in the STR resource.
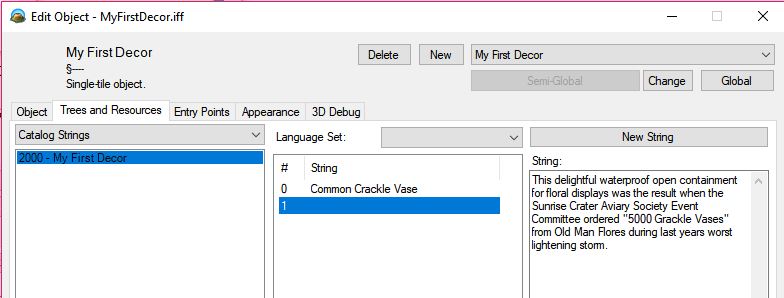
Repeat to add the second line, this time typing in the description that you want displayed in the buymode catalog (don't forget to hit Save again!)
Your catalog string resource is complete, but, once again, the game wont know to use it until you assign it to your object. This is done by highlighting it in the resource list and clicking the Select as My Catalog Strings button. You'll notice the name of the resource turns purple afterward (you may have to click somewhere to effect the change)
Take a Moment to Save Your File
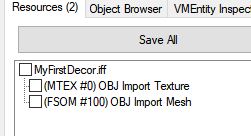
This is a great time to save your file. This is done back on the main Volcanic window on the Resources tab.
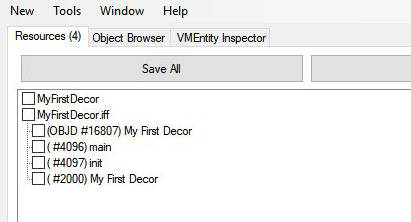
These should be the only things listed, but if you were naughty and got distracted and went nosing about in other objects you may find additional "changes" wanting to be saved in other objects. Ignore those. Just check the boxes for the ones for your new object and then click the Save Changes button on the right. Once your saved changes are no longer listed, you can Discard All other changes to make sure you don't mess up the rest of the files you were looking at.
Step Four - Edit your iff some more: Import your art
OK! That is your iff's "function" taken care of. Next we work on its "form" by importing your artwork into the object. This is done in three parts.
- First you import your 2D sprites.
- Next you create Drawgroups and fill those with your sprites.
- Last you import your meshes, associating them with the drawgroups you've created.
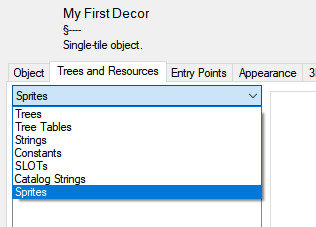
Trees and Resources - Sprites
Return to the TREES AND RESOURCES tab if you haven't already and choose "Sprites" from the drop down menu.
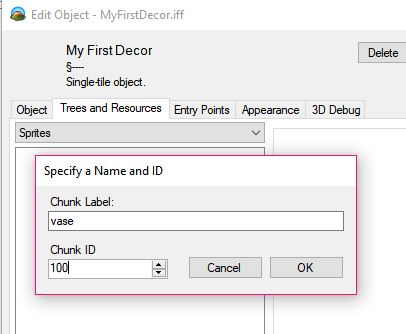
Just as you did when you created your Trees and Catalog Strings resources, click the New button to create a SPR resource. Each SPR resource holds 1 complete set of sprites. Label this one whatever you'd like. Just to mix it up a bit I'm going to name mine "vase" instead of the more generic "My First Decor" that I've been using for everything so far. You can actually leave the Chunk ID at 1, but I'm switching mine to 100 out of habit.
Highlight your new SPR resource to switch to the Sprites Editor where we'll import our sprites.
We want to import sprites that have already been made, but the Import and Import All buttons are both greyed out. We need to create placeholder sprites inside of our sprite resource in order to be able to use those buttons and we do this by clicking the New button on the right. We're going to leave "Automatically Generate Medium and Far Zooms checked". This will give us 1/3rd of the work to do. If you ever find yourself unhappy with the quality of the medium and far zooms in a future project, however, remember you can uncheck that and do them all manually.
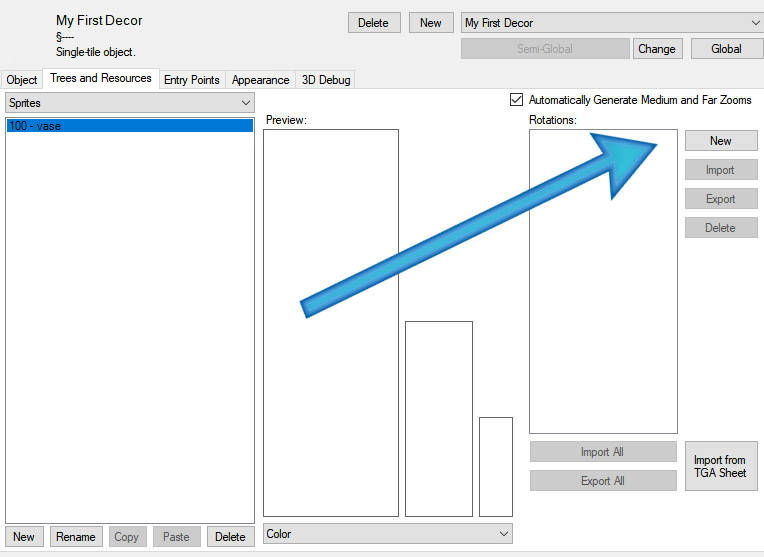
Now that the Import and Export buttons are enabled, we can import our sprites. Choose Import All and navigate to the folder on your computer that has the sprites set for this SPR resource. In future projects when you work with multi-tiled and animated objects you'll have more than one SPR and so will have more than one set of sprites made, but for this project we have just the one folder.
Even though we only created one sprite (rotation 0) when we clicked the New button earlier, the Import All button imported all of the bmps contained in our folder and, using their file names, figured out which ones belong with what rotation.
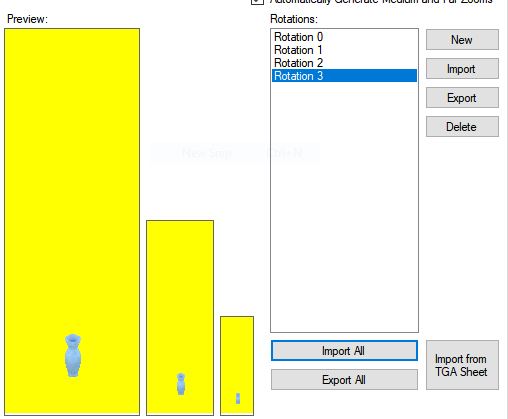
Don't be alarmed by the rather rough look of your object. You are looking at only one of three sprites that are used by the game, the "Color" sprite. If you are curious about the other two, you can check them out using the drops down menu below the sprite previews. The other two sprite types are the Alpha (A channel) and Depth (Z-buffer). The A channel smooths those ugly rough edges that you are seeing on the Color sprite, and the Z buffer is how the game fakes a sense of depth when you are playing in 2D.
The SPR resource need to get assigned to drawgroups next so the game can use them properly. To do this we switch to the Appearance tab.
Appearance (Drawgroups)
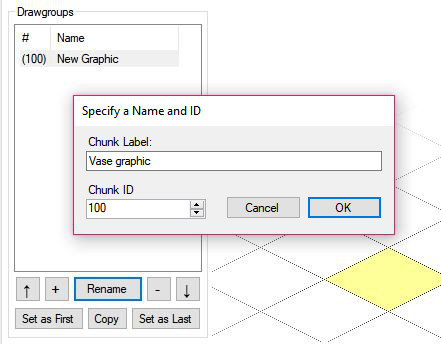
The Drawgroup editor on the Appearances tab uses pluses (+) and minuses (-) to add and remove things rather than "New" and "Delete" buttons, which leaves room for the up (↑) and down (↓) arrow buttons that allow you to rearrange the order of these elements. Add one drawgroup by clicking the + button, then select your new drawgroup and Rename it. (Normally I'd name it "Vase", but here I'm using "Vase graphic" to make it easy to tell the difference between the drawgroup and the sprites in the next few screenshots.)
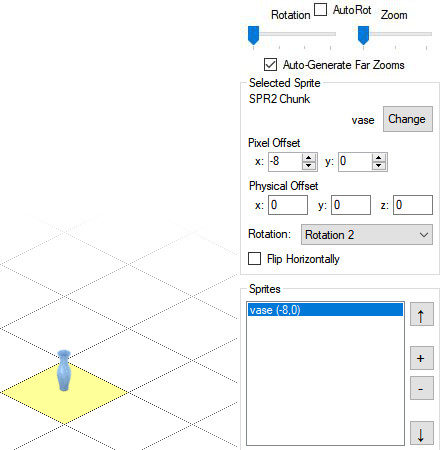
With the drawgroup still selected, add one sprite using the + button in the "Sprites" frame. A placeholder "sprite" is created for you. Use the Change button to open a window that looks very much like the SPR Editor you used earlier to choose one of your real sprites.
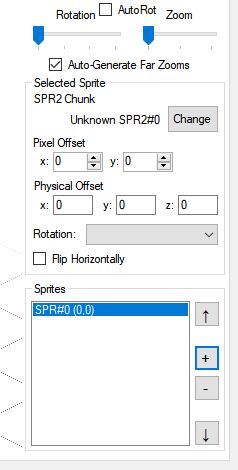
After selecting the SPR you want to use (you do not need to choose a rotation here. That gets done on the next screen), click the Select as Chosen Sprite button to close this window.

Now, back on the Appearance tab, you can see all three sprites working together. Wow, that A channel smoothing those edges makes a mighty big difference! If you have worked on TS1 objects in the past, you'll also notice, to your delight, that Volcanic figured out exactly where to place your object on the tile without you having to fuss with X and Y coordinates. You do still have the option of moving the object manually, should you ever need it, though.
If you are using your own art, you will probably find that your decor isn't facing the way you expect it to. If your object has a front, choose different rotations from the rotation drop down menu until your object is facing toward the lower left corner, otherwise go ahead and choose Rotation 2. If you are using the sprites of my simple little vase, you'll not notice any difference at all since it has no distinguishing features on any side. (So perhaps this wasn't the best object for this project. Hrm)
This takes care of one of your four rotations. Now you have 3 more to do. Recently an "AutoRot" checkbox has been added to Volcanic, but it does not currently work for me so we're just going to ignore it and continue manually. [AutoRot might be working by the time you read this.] Slide your Rotation slider over one tick, add a place holder sprite ( + ), choose your real SPR, and set the correct rotation. This time you'll want your object facing up and to the left so you are looking at its back. If you are using the example vase sprites, set this one to Rotation 3.
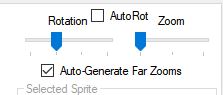
Repeat this twice more for the other two ticks on the slider, rotating your object clockwise as you go. That means choosing rotation 0 for the third tick and rotation 1 for the fourth, if you are using the vase sprites.
Your drawgroup is now complete but, just as with the catalog strings earlier, the game wont know it should be used unless you assign it to your object. The game needs to be told two things for drawgroups. First, it needs to be told which drawgroup to use as its first graphic ("graphic 0"). Do this by selecting your drawgroup and clicking the Set as First button.
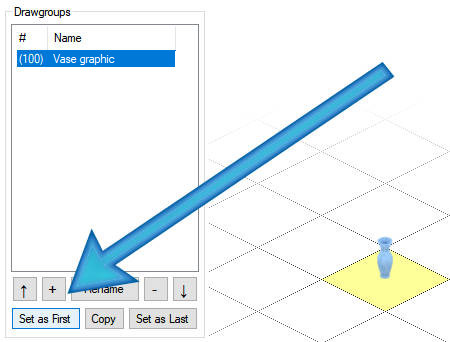
The second thing it needs to be told is how many drawgroups should be used. (The answer for this project is "one", of course, but animated objects can have several.) This is done in Volcanic by setting a "last" graphic in the same way a "first" was set and letting Volcanic do the counting. With our one drawgroup still selected, click the Set as Last button
That finishes your 2D artwork and now would be an excellent time to switch back to your main Volcanic window, in the Resources tab and SAVE YOUR FILE again.
3D Debug (FSOMs)
Importing 3D art is done on the 3D Debug tab.
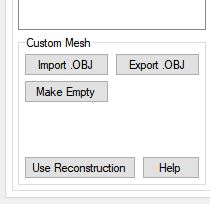
Check the "Save Changes to IFF (FSOM, MTEX)" checkbox and click the Use Custom... button (which will switch it the [Custom Mesh] options. The "Use Reconstruction" button will toggle you back to the [Reconstruction] options.)
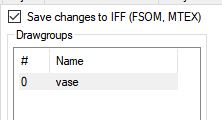
With your drawgroup selected, press the Import .OBJ button and navigate to the project folder on your computer that has the model you want to use and select it.
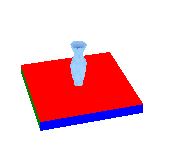
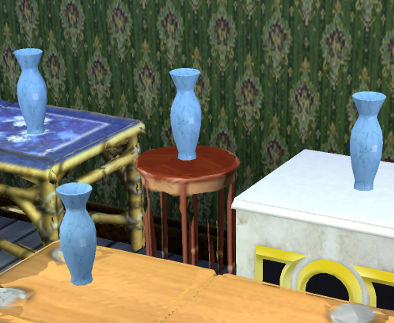
Your object might not look quite as good as you'd hoped at this point, but reserve judgment until you've seen it in-game where the lighting is very different.
Remember to Save Changes again.
Time to test your work in-game
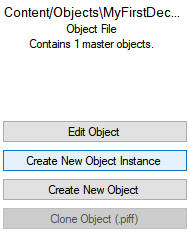
Since your object is not in the buymode catalog, you will need to use Volcanic to create it in-game. This is done from the main Volcanic window on the Object Browser tab using a button labeled Create New Object Instance.
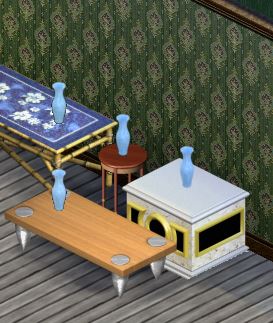
For objects that are allowed to go onto the floor, this isn't a problem; You can simply scroll over to an empty spot on the lot, highlight the object of your choice and click the button and POOF! it'll appear on the floor. For objects that require a surface or a wall, however, they need to have that surface or wall to land on. This can get annoyingly tricky for wall objects, but for surface objects like ours there is a nice little work around.
You just need to use Create New Object Instance to place an appropriate surface first, and then, without moving your camera, search for your decor again and use the same button to place it on to the surface. We've coded our decor to sit on a counter, a table, an end table or a desk, so any of those will do.
Step Five - Finishing Touches
You have one last thing to do before saving one final time, closing Volcanic and declaring your project finished. You need to add a thumbnail. This is the picture that will show in the buymode catalog. It may also used in some dialogs and in the action queue. Volcanic has a handy-dandy Regenerate button in the bottom right-hand section of the Object tab that will generate a thumbnail for you. Push that button and your task is complete.
Save one final time.
There's a few bits of information you'll need to give when you submit your custom content for consideration. This information is needed to add your object to the buy or buildmode catalog. Make a little text file that you can store with your object and note down the following:
- Your Object's iff file name
- Your object's Internal Name
- Your Object's GUID
- Your Object's Catalog information, copied from the XML Entry tab
Congrats! You completed your first object. What comes next?
This guide taught you how to make a base object, and threw in the oft-used room score and allowed height flags as a bonus. Here are still a few other really common tasks you'll want to look into now.
- How Tree Tables work so you can add an interactions menu to your object.
- How to use STR#128 to animate Sims when they interact with your object.
- Adding Multiple Drawgroups and using them to animate your object.
- Creating a Multi-tile Object (and learning to manage all of the above properly in a multi-tile object.)
You will also want to learn when and why to use attributes vs temporary storage vs local storage vs parameters vs constants